Began major construction today

6/19/2007

I began construction on the stand to fit my 55 gallon display and 55 gallon sump. Figuring out how to put both of them in one stand was a bit of a challenge, but I think I've got it worked out pretty well.

This vast stretch of empty wall is just begging to filled with zooxanthellae symbionts.


You'll have to wait a few more minutes to see the stand begin to come to life (the anticipation is killing you, I know!!). First came the nerve-racking part of the construction. I ordered a diamond hole saw ($10 including shipping from Hong Kong), did a little meditation to calm my nerves, and then went to town on my tank. The holes actually went very easily, it took about 5 minutes to drill each one. I started off using plumbers putty and water in the middle and wound up ripping all of that off and just pouring glass cutting oil on the area as I went along.


Supplies:


The "rig":


Success!!


And now the moment you've all been waiting for! After careful planning and one screw-up (we'll just pretend that this is the first time I've attempted to build the stand), I came up with a sound plan. First I cut all of my 2x4's and marked them (so I wouldn't mistake them for scraps!).


Next came the construction, first the top and bottom:

Then with the supports in place:

Added an OSB board to go under the tank and two supports in the back for the canopy:

And last for today, I test fitted the tanks to make sure before I begin construction of the fancy looking facade:

Tomorrow I'll finish up the facade and cut some holes in the OSB for plumbing. I'm going to wait for my Lights to arrive before building the canopy.

Finished the unfinished base...

6/20/2007

Today I finished up with the bottom of the stand. I still have to stain and seal the whole thing, but I'll wait until I build the canopy to do that.

First I cut the boards for the sides and front with doors. The cuts are a little rough, this is my first time attempting any woodwork like this... Thank goodness for trim around the edges!
I attached the sides and installed the trim, I originally attempted to use fancy looking molding, but after much frustration, I decided to keep it simple with 1x4s for the trim. I found that I got the cleanest straightest cuts doing everything with a hand-saw, I'm pleased with the way it turned out...
I kept the front doors very simple, no hinges, just a single latch at the top. That way I can set the door to the side and it doesn't get in my way when I'm trying to work! One side is also a false door to allow for easy removal of the sump and display tank. It's connected with hinges and a magnet to keep it shut.
I'll finish out the rest of the trim after I build the canopy, I'll run a piece up the back side of the tank so you can't see the back edge and probably another piece up the back of the stand.. I've got a pretty dark stain to put on after everything is done. My lights just shipped today so I've got a few days before I build the canopy, I'll probably start working on the plumbing next.

Everything holds water!

Friday 6/22

The first thing I did was to fill up my sump tank, it's a used tank and I wanted to make sure there were no leaks before I went any further. Not a drop!

I ordered my glass for the sump and the overflow from a glass shop, it's pretty cheap and I could get the thick stuff (1/4") for everything. It took them about an hour to make it and the measurements were perfect. Thanks Jack Ricks Glass! Little did I know what was lurking beneath the paper covering on my acrylic.... Keep reading to find out!


Next, I cut my acrylic pieces to size using an acrylic knife and a steel yardstick. You have to go very slow at first to keep the line straight, and just keep cutting until a light flexing will snap the piece with a clean cut. One piece has a busted edge, I think the post office was playing frisbee with it, but that was a scrap piece anyway, I put it under whatever piece I was cutting to keep from sliding the acrylic knife off the end and gouging the floor! I also kept the floor vac handy to clean up my mess as I went along...

Next, I used the circular saw to cut some notches in the top of the acrylic, the notches were pretty small, so I spaced them pretty closely, hopefully they will provide enough flowthrough... I built a jig to set everything in and test fitted the glass pieces inside the acrylic. I set them up like this so that the glass would allow strong bonding with the tank glass, and the acrylic would give me the color I desired and allow me to cut notches at the top. I think the way they are layed in also gives a bit more structural stability to the whole thing...

The acrylic sticks up 1" higher than the glass for notching. Still haven't peeled the backing off, what's going to happen!?!


Next I built a second jig so the pieces could rest evenly together. I peeled one side of the paper off so I could bond the acrylic to the glass, looks like black acrylic to me! I used marine epoxy (saltwater proof) to stick the acrylic to the glass and siliconed the corners where the glass comes together. I used a couple C-clamps to hold the sides up until everything set.

Now let me give you a piece of advice. Before you go this far, peel a little of the paper off to make sure you got the right color, and make sure you peel both sides off. I peeled the outside off once everything was dry and uh-oh, I can see through it. It's not black, it's very dark tinted translucent black! Now I'm mad, I ordered black acrylic, let's contact the supplier and let them have it, better review the order first... Wow, I ordered TRANSLUCENT black acrylic, oh well, I'll just have to use my thinking cap to make it work. I went ahead and siliconed the overflow into the tank. I used masking tape on the tank, but didn't think to use it on the overflow, the edges don't look too bad though, gives it character... I reconfigured one of my jigs and attached it to the center brace to hold the overflow in place while everything set up.


The next morning, I tested things out. It holds water!! HOORAY!! It's a good feeling when something I built seems to work right. Makes all the pain and frustration worth while... I think with paint all the way across the back and some well placed lighting (or shading) the acrylic will look black after all.

Next, I began installing the baffles in the sump. I was already frustrated about the acrylic color and things just got disastrous at this point. I taped off the edges of each baffle and started putting silicone in. I installed three and started to silicone the other two, I ran out of silicone about half-way through the first of the two and in my frustration resorted to scooping globs of silicone out of a busted tube with my fingers, this made a huge mess of everything! In my frenzy, I forgot about the masking tape on the other baffles and when I began peeling it off, the silicone on the tape stayed behind leaving messy little globs attached to everything. I decided to call it quits for the day at this point and cut my losses. After setting up, the baffles seem to be well secured and I think I'll leave it the way it is (this one has a WHOLE LOT of character). It looks like a silicone bomb went off in the tank, but I'll tidy things up with a razor blade later on. Still have one more baffle to do.


I have other household projects going on at the same time, I also refinished two end tables today (forgot to take before pictures, but they look much better!)
And I'm about to rebuild the Kitty Tree, I built this a few years ago and its gotten good use from Kitty and Zak! I'm going to recarpet it and resize it to fit the window.

I think after all this frustration, I'll take it easy for a day, probably paint the back of the tank and silicone the other baffle. I may even go to the beach and relax a little (Haven't done that since we moved down here!). I've got all of my supplies for running the plumbing, but I think that will have to wait a day or two.

Getting closer!

6/25/2007

I feel like I can almost hear the ocean in my tank. Oh wait, that's the real ocean! I did get a chance to go to the beach on Saturday, it was a nice break.

I also set up to paint the back of the tank. I've got all my supplies laid out, masking tape, paint, and most important, BUG SPRAY! The mosquitoes have risen to plague status in my backyard and seem to be getting worse despite my efforts to locate any stagnant water...
I also got my last baffle sealed in place. As requested, here's a closer picture of the baffles, it's kind of hard to see with all of my silicone mess!
This drawing is the layout I'm using for the sump. The only change from the plan I'll be running the skimmer off of it's own small pump...
Sunday I wasn't feeling too well (maybe it's all the silicone, paint, and polyurethane fumes!) so I didn't get too much done. I did get the tank back on the stand, the black back turned out pretty well

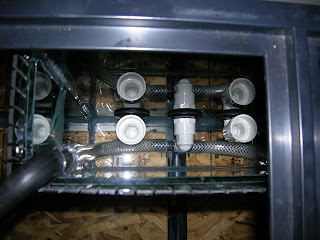
Today I got the plumbing work done. The original plan was to run the skimmer off of the overflow coming from the tank, but due to space constraints, I'm just going to get another pump for it. Plus, when I added up the cost of all the fittings and unions it was going to take, it costs just as much as a pump! The plumbing is pretty simple, the return from the pump and the overflows are both inside the box in the tank. The standpipes will be dursos, I'm waiting on a couple of fittings to come in the mail to finish those out. (I went to HD, Lowes, and 3 plumbing supply stores and none of them stock a 1" 90 MPTxFPT elbow!). The pump return lines come over the top of the overflow, I thought about using lockline, but man that stuff is pricy!! The way I've got it gives me freedom to move the returns wherever I want them around the overflow box...
And coming out the back of the tank into the stand...
The overflow pipes are both 1" (the Dursos will be 1 1/4 as recommended) and they join together into a 1 1/2 line running into the sump. The return from the pump splits into the refugium and up the display tank with ball valves on both to control flow. The line to the tank is flex tubing (just worked better with the space I had, I thought it might cut down on some vibration noise too). Of course, nothing is cemented or clamped in place yet because I've got to pull everthing out of the stand one more time to stain and seal it. I put unions in key spots so I could pull plumbing apart later if the need arises, or replace the pump quickly.
Finally, I refinished the coffee table today too. I did get before and after shots of this one...


Next up, hopefully tomorrow (that's when my lights are supposed to show up) I'll finish building the canopy and stain the stand. Then it will be almost ready to go!!

Let the games begin...

6/27/2007

I spent most of yesterday (Happy Birthday to me!) waiting on the UPS man. The website said "out for delivery" at 5:30am and every truck that went by sounded like the UPS truck. Finally at 5:30pm, I saw a UPS truck go whizzing by, it didn't look like it was stopping but it slammed on the brakes about 2 houses past mine. The guy hopped out with my box and my Birthday surprise to myself was finally here. I brought it in and opened it up, styrofoam peanuts flying to the far corners of the house...
Everything was well packed, lots of peanuts, and the lights were shipped in a pvc tube (also packed with peanuts). Overall I was pleased with my order from dtpetsupplies.com, they even contacted me on a Sunday after I placed my order to clear some things up so they could ship ASAP. So far I'm pretty impressed with the Coralvue T5 retrofit kit, seems to be well put together. The reflectors are a very shiny aluminum, they come with a protective white layer that is peeled off when ready and they attach directly on to the bulbs. The dog tail did not come with my order, I already had one of those sitting around...
Took some measurements and now its on to the canopy! I started with the frame..
Added some plywood, I had to use two pieces on the front, I was running out of wood! I can tidy that up with some trim later...
Then came the trim. Hand cutting these pieces takes a little time, but it felt good once everything was finally together. I had to cut a small notch in the top side trim pieces to allow the front to swing open, hadn't planned for that, but I still think it looks alright..
The side still opens for access with the canopy in place:I spaced the bracing in the top so that I would have open access to the overflow without removing the canopy.

And now the moment you've all been waiting for, the first test run of the lights. These things are pretty bright!
I know most people would put 4 T5's on a 55, but I really think that these two alone with individual parabolic reflectors will pack as much punch as 4 bulbs right next to each other in a hood with one reflector. Not to mention, less energy cost. I plan on keeping mostly softies and I've read about people with 4 bulbs having to move their lights up and away from the tank to keep from burning up their soft corals. Pardon the blurry picture, no flash, I wanted to show the amount of light coming out, I haven't put the reflectors on yet, so all the light shining up out of the tank will be reflected down as well.
Now, on to seal the stand and canopy. After much debate, I've decided to leave the stand the color it is and put a clear poly seal on it. I really like the grain of the wood, the trim I got was amazing, out of 80', there was only one half of a knot... I hope to have this done today and everything completely put together tomorrow. I'm also going to paint the wood that the tank sits on black just in case I decide to go bare bottomed (get your mind out of the gutter, I'm talking about the tank!).

I told you about the plague, after finishing this morning, I went outside with the dogs to relax and have a cup of coffee. By the time I put repellent on my arms and moved on to my legs, I had already been beseiged! Time to get the napalm out!!!

Almost ready for some life!

6/28/2007

Too tired to rant tonight... The tank is up and running!


Murder on the high seas

7/5/2007

I'm working these days so I don't have time to do my long winded daily blogs any more, maybe I'll get a chance this weekend to bore everyone to tears...

I got my rock in from Tampa Bay Saltwater. Richard was great to deal with, I'm tight on money at this point (kind of like when you get near the end of building a house and can't actually afford to live in it). But due to some birthday greetings, I got a "package" to start me out. I only got the 20 gallon package, so I've got some space to fill, but I'm planning on landscaping half the tank at this point and leaving the other half for some open swimming area. I'll be able to add some rock here and there as I go.

Richard shipped the rock out from Tampa on Tuesday morning and I had it in my living room Tuesday evening. The tarp turned out to be a really good idea....

I unloaded the live sand first (I went ahead and got 55 pounds instead of 20 so I could fill up from the start). Right from the start, everything in the boxes smelled great, no rotten dying smell. I put the sand in and moved on to the rocks..
This rock will get me started and once everything is cycled, I'll get more rock in the second half of the shipment along with all the little critters... I've spread everything out for now, I know it doesn't look like much, but I was really pleased with the amount of life on the rock and some of the pieces have some pretty nice structure to them. I believe that the second half will be more "deco" rock that will have a bit more shape to it and its supposed to have some hard corals on it.

And on to the Murder! Jenny was thrilled to be the first one to spot the brittle star that hitchhiked it's way in with the rock. But today I came home to find it just laying there
systematically dismembered and disemboweled. Now I have to solve the mystery and figure out who the murderer is...